

![]() Managed Order Console
Managed Order Console
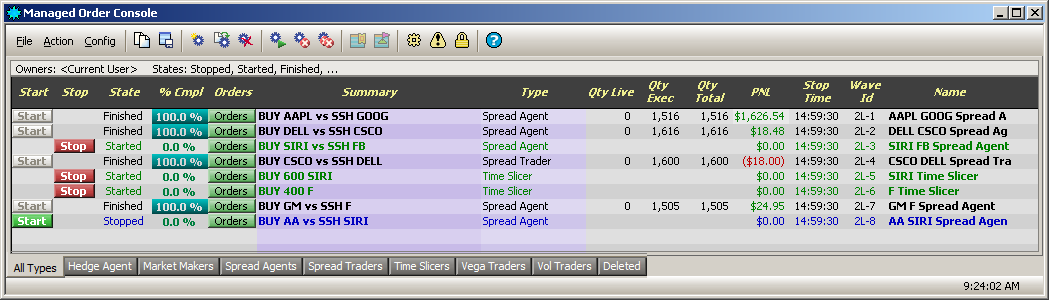
The Managed Order Console is a grid that displays the real-time status of managed orders (Hedge Agent, Spread Trader, Spread Agent, Market Maker, Time Slicer, Vol Trader). Each row in the grid corresponds to a single managed order and is color-coded to represent the current state of the order (i.e., ready, started, marketable). Additionally, Start/Stop and Alert buttons can be displayed in the console allowing control of each managed order.
Configure Managed Order Console
Owners and creators of managed orders, managed order types and their state(s) are configured in the Managed Order Console.
Access the Configuration Window:
From
the Config menu select
Configuration.
Alternate Methods:
Right-click
the mouse anywhere in the Managed Order Console window and select
Configuration.
Click on the toolbar's Configuration
icon ![]() .
.
Set General Parameters
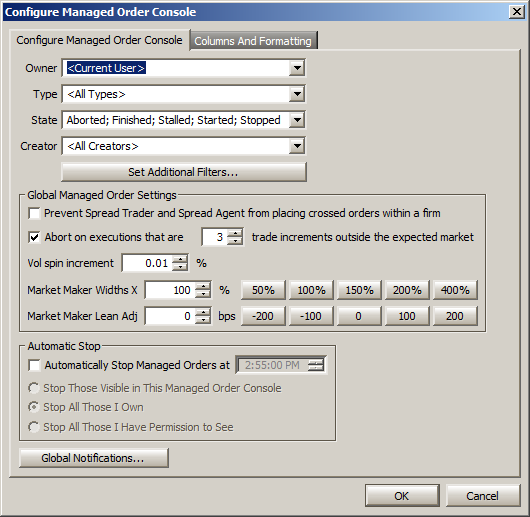
From the drop-down lists, select the filters that determine the data to be displayed in the Managed Order Console.
Owner—Select <Current User> to view all of your orders exclusively. Select <All Owners> to view orders from all users that you have permission to view.
Otherwise, select one or more user names from the list.
Type—Select one or more managed order types to display. Select <All Types> to display Market Maker, Spread Trader, Time Slicer, and Vol Trader orders.
State—Select one or more managed order states to display. Select <All States> to display Aborted, Finished, Stalled, Started, or Stopped states.
Creator—Select one or more creators to view their managed orders, or select <All Creators> to view orders for all listed users.
Note: The creator of a managed order isn't necessarily the owner.
Set Additional Filters—In addition to the filters already described, filters specific to managed orders such as Orders, PNL, and Status Messages can be defined along with a condition (<, >, =, etc.) and target value. Additional filters are defined in a manner similar to Row Color Conditions.
Global Managed Order Settings
Prevent
Spread Trader and Spread Agent from placing crossed orders within
a firm
Spread Trader and
Spread Agent will
be prevented from filling a crossed order (i.e., an order to buy and
sell the same stock, usually for the purpose of making a quotation)
if this option is checked.
Abort on executions that are _ _ _ trade increments outside the expected market
When selected, a managed order will abort if the execution price is X increments outside the expected price (the market bid or ask price that WTP had at the time the order was sent).
Note: Contact WEX Support to have this feature enabled.
Vol Spin Increment
The value entered will be reflected in the Vol % field of Vol Trader where each pressing of the spinner arrow will move in the defined increments.
For example, a Vol % Increment of .20 is seen in the Vol % field of Vol Trader as .20, .40, .60, etc.
Limitations on Vol Spin Increments
The Vol spin increment value cannot be zero, less than zero, or greater than 1.0. An error message will display if an entered value is outside these limits.
Note: The Vol spin increment defined here is good only when manually adjusting the vol %. Adjusted increment values must not be confused with the Snap Vol button in the Managed Order Console. When the Snap Vol button is selected, it does not acknowledge the defined vol % increments, but relies on an internal calculation based on a number of factors (market conditions, reference prices, etc.) when displaying the vol % in the Managed Order Console.
Market Maker Widths X
The width multiplier is used exclusively with the Market Maker managed order. (Note: Access to Market Maker is by permission only. Contact WEX Support for more information.)
Width is added to the Market Maker's theoretical market. This feature multiplies the widths of all owned Market Makers. If market conditions become unfavorable, a trader may increase the width multiplier to 200% or 300% to instantly become less aggressive across the board. By globally increasing or decreasing their Market Maker widths, traders have broad control over their risk.
Select one of the percentage buttons (50%, 100%, 150%, 200%, 400%) or enter any percentage value in the Market Maker Widths X field.
Market Maker Lean Adj
The value entered here (in basis points (bps)) moves the lean of all market makers owned by a user.
The lean
adjustment is calculated as follows:
Market Maker Lean Adjustment
x (1/10000) x Derived Reference Price = Additional
Lean Amount
The total lean is the sum of the current lean + the added lean amount.
Example:
1. Market Maker Lean Adjustment = 100 bps
2. Current lean value= 1.00
3. Derived Reference Price = 13.38
100 x (1/10000) x 13.38 = 0.13 (the additional lean amount)
1.00 (the current lean value) + 0.13 = 1.13 (Market Maker's total lean)
Select a Market Maker Lean Adjustment bps value from one of the pre-defined buttons (-200, -100, 100, 200) or enter a value. Selecting "0" means no additional lean amount will be added to the current lean.
Automatic Stop
Managed orders can be stopped on a per-order basis. If enabled, a selection is made to determine which managed orders are to be stopped. If the Managed Order Console is closed, automatic stop will not commence.
Automatically Stop Managed Orders At—Enter a time of day either manually or with the up/down (spinner) arrows when managed orders are to be stopped. If this is checked, one of the following conditions must be selected:
Stop Those Visible in This Managed Order Console—All managed orders listed in the Managed Order Console will be stopped at the defined time.
Stop All Those I Own—Only the managed orders owned by you will be stopped at the defined time.
Stop All Those I Have Permission to See—Managed orders that can be seen in the Managed Order Console may or may not be owned by you. Select this option to stop the managed orders that you have permission to view.
Global Notifications
A notification (sound and/or text) can be sent if a defined managed order condition exists.
See Global Configuration for instructions on defining an event's notification.
Columns and Formatting
See Columns and Formatting for instructions on setting grids, color conditions, header styles, and more.
There are a number of methods for creating one of six managed orders:
From the Action menu select New Managed Order--->Managed Order Type
Alternate Methods:
Right-click anywhere in the Managed
Order Console and select New Managed Order--->Managed Order Type
Click on the toolbar's New
Managed Order button  and select a managed
order. Select a firm name (if more than one is available) from
the drop-down list.
and select a managed
order. Select a firm name (if more than one is available) from
the drop-down list.
Type one of the following keyboard shortcuts:
Managed Order
|
Keyboard Shortcut
|
Hedge Agent
|
Ctrl + Shift + h |
Market Maker |
Ctrl + Shift + m
|
Spread Agent
|
Ctrl + Shift + s |
Spread Trader |
Ctrl + Shift + d
|
Time Slicer |
Ctrl + Shift + t
|
Vega Trader |
Ctrl + Shift + b
|
Vol Trader
|
Ctrl + Shift + o |
Choose Type and Firm* |
Ctrl + n |
*The option Choose Type and Firm brings up a window where a managed order and firm name are chosen.
Note: Pressing the New Managed Order button also opens the Choose Type and Firm window.
Any managed order can be cloned (i.e., copied). When an order is selected for cloning, its name will be appended with the word "copy." A cloned managed order does not necessarily need the same parameters of the original in order to execute.
Select a
managed order in the Managed Order Console by clicking on it.
Right-click
in the grid and select Clone
Managed Order.
Alternate Method:
From the Action menu, select Clone Managed Order.
The cloned managed order will display and can be edited before starting.
Managed orders can be started in their configuration window (by pressing the Start button) or in the Managed Order Console.
Start Orders from the Managed Order Console
Press the Start button on each row containing the managed order. (Note: Be sure the Start column is displayed in the Managed Order Console. If it isn't, it will have to be added. See Columns and Formatting for more details.)
Alternate Methods:
Select
one or more rows in the Managed Order Console and click the
Start Selected Managed Orders button  .
.
Select
one or more rows in the Managed Order Console and right-click
the mouse. Select Start Selected
Managed Orders.
Select one or more rows in the Managed Order Console and select Start Selected Managed Orders from the Action menu.
In all cases, a dialog window will ask for confirmation before starting an order.
Managed orders that have started can be stopped in their own window (by pressing the Stop button) or in the Managed Order Console.
Press the Stop button on each row containing the managed order. (Note: Be sure the Stop column is displayed in the Managed Order Console.)
Alternate Methods
Select
one or more rows in the Managed Order Console and click the
Stop Selected Managed Orders button  .
.
Select one or more rows in the Managed
Order Console and right-click the mouse. Select Stop Selected
Managed Orders.
Select one or more rows in the Managed Order Console and select Stop Selected Managed Orders from the Action menu.
In all cases, a dialog window will ask for confirmation before stopping any order.
The following managed orders can be stopped with the Stop All Managed Orders command:
Orders
visible in the Managed Order Console
Orders
owned by the user
Orders the user has permission to see
Press the Stop All Managed Orders button  .
.
Alternate Methods
Right
click in the Managed Order Console grid and select Stop
All Managed Orders.
From the Action menu, select Stop All Managed Orders. This window will display:
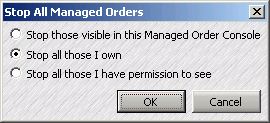
Make a selection and click OK. A window will display asking for confirmation before stopping any managed order.
Managed orders can be deleted from the Managed Order Console. In all cases, a dialog window will ask for confirmation before deleting any order.
Delete One or More Managed Orders
Highlight
one or more rows in the Managed Order Console and press the delete
managed order icon  .
.
Alternate Methods:
Press the delete key.
Right-click anywhere in the Managed
Order Console and choose Delete Selected Managed Orders.
Click the Action menu and select Delete Selected Managed Orders.
A defined set of circumstances can be configured for a particular managed order. When market conditions match the defined circumstances, an audible or visual alert is given.
The Alert column and its associated Enable column are optionally displayed. If a box is checked in the enabled column, the corresponding alert will become active and will be triggered once the specified alert conditions are met.
Enable the Alert Columns
Press
the Alert Columns button  .
.
Alternate Method:
Right-click anywhere in the Managed Order Console and select Show Alert Columns.
Two columns (Enable, Alert) will be added to the Managed Order Console.
Set Alert Conditions
Press the
Alert button. A
configuration window similar in look and functionality to the
Row Color Conditions window
will display.
Define one
or more expressions, an Alert
Priority value, and check to specify whether the Aggregate value should
be considered.
Select OK to accept your changes and close the window or Apply to save your edits and keep the window open.
The Alert button is displayed in one of three colors:
|
The Alert has been enabled, but has no match to the defined condition has been made.
|
|
The Alert has been disabled (the Enable box has been unchecked). Check the Enable box to re-enable the Alert.
|
|
The defined condition has been met.
|
Disable the Alert Columns
Follow the same procedure used to enable the Alert columns.
The color of each row in the Managed Order Console indicates the state of the managed order:
Color
|
State of the Managed Order |
|
Aborted |
|
Finished |
|
Marketable |
|
Not Owned |
|
Ready |
|
Stalled |
|
Started |
|
Stopped |
Note: The row colors cannot be configured.
Using Reverse Spread Trader, you can create a new Spread Trader that is used to reverse the positions of a selected Spread Trader. The side types of the original Spread Trader are reversed in the new Spread Trader. The Targets of the new Spread Trader are determined by which type of reverse Spread Trader was created, as such:
Reverse Filled Quantities sets the
new Targets to the traded quantities of the original Spread Trader.
Reverse Entire Spread sets the new Targets to be the same as the original Targets.
To Use Reverse Spread Trader:
Right-click on a row containing the
spread trade that is to be reversed.
Choose Reverse Spread Trader-->Reverse Filled Quantities
Alternate Method:
Choose Reverse Spread Trader-->Reverse Entire Spread
If Reverse Filled Quantities or Reverse Entire Spread is selected, the new Spread Trader configuration window will open allowing for additional changes before the managed order is applied.
When the Managed Order Console is in read only mode, managed orders cannot be edited through the grid controls.
Put Managed Order Console in Read Only Mode
Press
the read only mode button

Alternate Methods:
Right-click anywhere in the Managed
Order Console and select Read Only Mode.
From the Config menu, select Read Only Mode.
Managed orders that have been started and have generated a Wave ID displays the order details in the Order Grid.
Select one
or more managed orders in the Managed Order Console.
Click the
Order Grid button ![]() .
.
Alternate Methods:
Right-click on the managed order
and select View Order Detail.
From the Action menu, select View Order Detail.
Managed orders that have been started and have generated a Wave ID displays the position details in the Position Grid.
Select one
or more managed orders in the Managed Order Console.
Click the
Position Grid button ![]() .
.
Alternate Methods:
Right-click
anywhere in the Managed Order Console and select View
Position Detail.
From the Action menu, select View Position Detail.
Orders in the Managed Order Console can be exported to a file, the clipboard, or to Microsoft Excel.
Click here for detailed information on exporting grid data.
Any delimited tabular data or previously exported managed order can be imported to the Managed Order Console.
Select
the Import Managed Order button
 .
.
Alternate Methods:
From
the Action menu, select Import
Managed Orders
Right-click in the Managed Order
Console and select Import Managed Orders
Type Ctrl +i
Double-click on a file name to import, or click once and press Open.
An Import From File window displays:
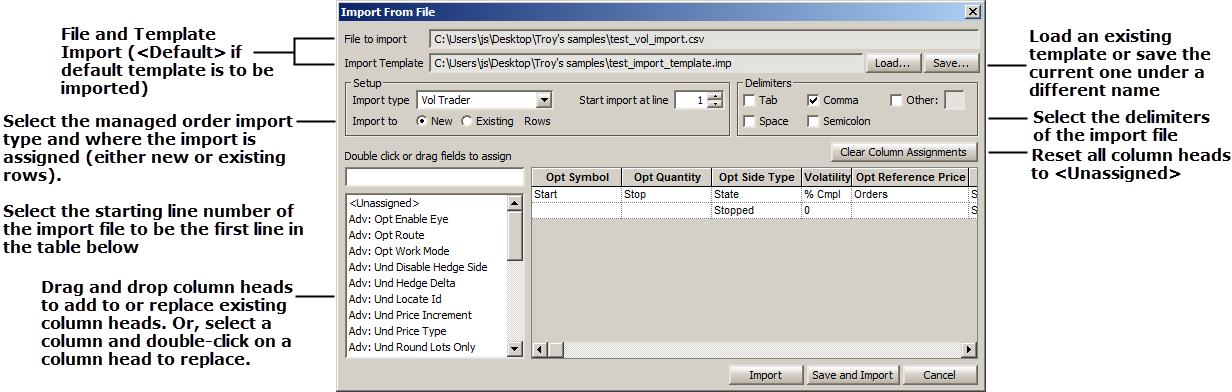
Before the file import can proceed, the following values must be defined:
Start Import At Line—The number in this field refers to the line number in imported file. When the file is imported, the first line displayed in the Managed Order Console will be the line selected here.
In the example above, Line 1 is selected. When the file is imported, Line 1 will be the first line displayed. Since this line is really nothing but headers, a better choice would be to Start Import at Line 2.
Import Type—The managed order type that is being imported. Mixed managed orders cannot be imported in a single pass. Select an Import Type from the drop-down list.
Import to—Two choices, either New or Existing Rows
New—A new managed order will be created
from each row in the import file.
Existing Rows—Managed orders owned
by you in the Managed Order Console will be modified with the new
data contained in the imported file.
Import Managed Orders into Existing Rows
When importing to existing rows, new managed orders are not created. The values specified in an import file are simply modified on existing managed orders. For this to happen:
Note: Some values cannot be modified while importing to existing rows. Side types, symbols, portfolios, and a few others are specifically prohibited from changing if a managed order has already been started during the current day.
Assign Columns—At least one column must be assigned a name in order for the import feature to commence. Column heads may already exist because of the import template being used or they may be unidentified. Such unidentified columns are labeled <Unassigned>.
Select the column in which the column
head is be changed by clicking on the column. Next, double-click
on a column head name from the list on the left side of the window.
The column will now carry that new name.
Alternate method:
Select
a column head and drag and drop the head name on the desired column.
Clear Column Assignments—Select this button to change all column heads to <Unassigned>.
Delimiters—These checked boxes refer to the various field delimiters that could be contained in the import file. A different delimiter can be selected, but better results will occur with the delimiter used in the import file (i.e., a tab-delimited file will produce better results when tab is selected).
Templates—Once the columns have been assigned names, they can be saved for later use. Press Save to save and name your template.
When importing a file with the same import type, press Load and select the appropriate template for your import type.
Default Template—Once an import template is loaded, that template becomes the default import template. When a subsequent command is issued to import a managed order, the Import Template field will display <Default>. If an import template different than the default is desired, press Load and select a different template. The different template will then become the new default import template.
Press Import to import the file into the Managed Order Console. Save and Import allows the import template to be saved (where a filename is defined with a .imp extension) and imports the import file into the Managed Order Console.
Tips for Importing Managed Orders
Create a Managed Order import template. For
example, when importing Spread Trader managed orders, the
Import From File dialog box should have a column name for
each field in the imported file.
Note 1: The data in the column Managed Order ID is generated automatically. Note 2: Press Save Import Template and save your work. Load the Import Template on subsequent imports to eliminate the need to manually assign column names.
|
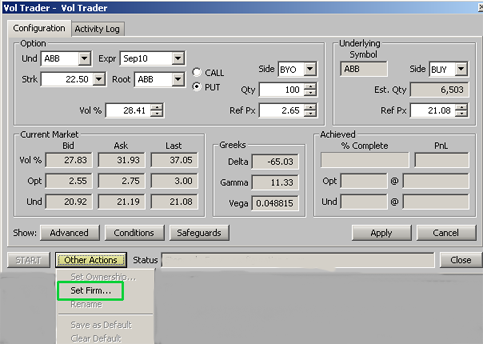
When a relationship is established between a WTP applet and a managed order (via the send to feature), or when a managed order is launched, the user's current firm is selected by default. "Set Firm" allows a user to choose a different firm for the managed order.
To set a different firm for a managed order, press the Other Actions button and select Set Firm. A Set Firm window appears. Select Other Firm and make a selection from the drop-down list.

Once a managed order has been configured and the "apply" button has been pressed, the Set Firm option is no longer available even if the order has not started. Set Firm is also not available if the managed order is stopped and re-edited.
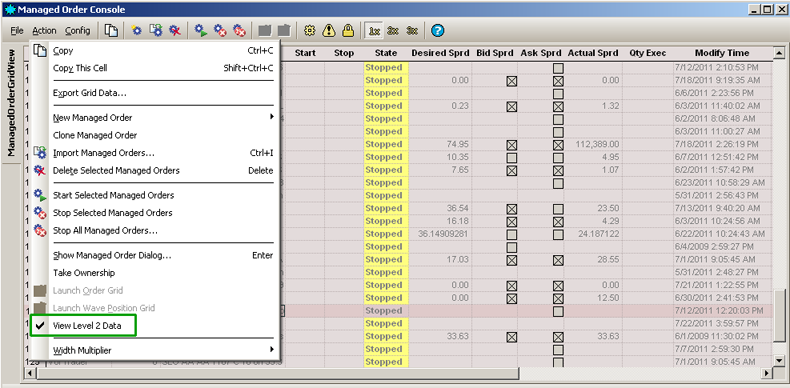
The menu option View Level 2 Data, when activated, will cause the Equity Quote Cube and/or Option Quote Cube (depending on the managed order) to launch when a managed order is selected. If View Level 2 Data is turned off while the quote cubes are displayed, the quote cubes will close.
To activate View Level 2 Data, select it from the Action menu or right-click anywhere in the Managed Order Console grid and select View Level 2 Data.
![]()
© 2015 Wolverine Execution Services, LLC
