Global
Configuration
Global
Configuration
Default selections and default features that cover all items in the WTP suite are selected on the nine screens that make up Global Configurations.
A connection can be made between two or more WTP applets via the Send to--> command. When a connection is made, the applet being connected to responds by displaying the same symbol as its parent (i.e., the connecting applet). As the parent's symbol changes, so does its child (the applet the parent is connected to), if defined as such.
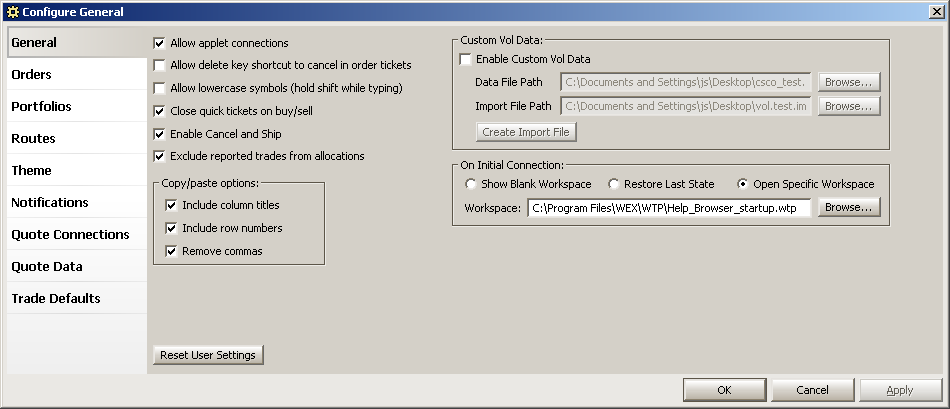
Check the Allow Applet Connections box to have this feature enabled when issuing the Send to--> command.
Note: Connections already established will not be broken if the Allow Applet Connections is subsequently unchecked.
Learn the specifics of Connections here.
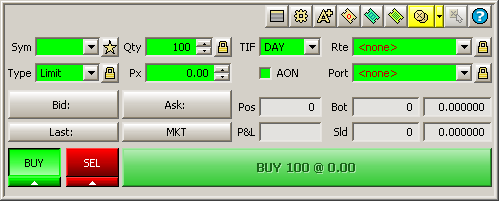
Allow delete key shortcut to cancel in order tickets
Cancel an order in an Order Ticket by pressing the Delete key with this option. A confirmation window will appear when the box is checked:
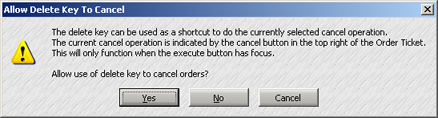
Press Yes to allow the delete key to cancel orders. Press No or Cancel to close the window and not allow the delete key to cancel orders.
Allow lowercase symbols (hold shift while typing)—Symbols entered in an order ticket are in uppercase by default. If this box is checked, symbols can be entered in lowercase. To enter lowercase characters press the shift key when typing.
Close quick ticket on buy/sell
An Order Ticket can be accessed directly from a number of WTP applets.
If the Close Quick Ticket on Buy/Sell is checked, an Order Ticket will automatically close once a buy or sell order has been issued.
Enable Cancel and Ship
When changing an order, the route for that order can be simultaneously changed. This effectively cancels the order and makes a new order on a different exchange.
The following is a sequence of events that can occur if the Enable Cancel and Ship feature is active:
An
order has been submitted.
The
order is accepted by the exchange and is considered Live.
A
request to change the order is made.
The
original order is canceled by the exchange.
The
gateway sends the replacement order to a different route where
the order could end up at a different exchange.
The replacement order has been accepted.
Check Enable Cancel and Ship to activate this option.
Exclude reported trades from allocations
If a stock purchase is done away from WEX and then reported (using the Report Trade Ticket), the trade will be excluded from the Allocator if the Exclude reported trades from allocations is checked.
There are three options that can be selected when copying data from any WTP grid and pasting the data into another application.
Include
Column Titles—The column head will be included when pasting
grid data into another program.
Include
Row Numbers—Each row will have its own number. The numbers
will be visible when pasting grid data into another program.
Remove Commas—The commas used in numerical strings (i.e., 7,200) will not be seen when pasting grid data into another program.
Custom IVol values that are stored in a comma-delimited source file can be imported into one of the various WTP grids where Options data is reported (for example, Option Quote Cube or Quote Grid).
The comma-delimited source file is imported along with an import file (containing the relevant column headings). If no import file exists, it must be created and have its column headings defined.
Once imported, a new column Custom IVol is added to the grid. The custom IVol values (multiplied by a factor of 100) are added to the Custom IVol column, matching the strike price and expiration date that is listed in the source file.
If a change is made to the source file after importing, a confirmation window will display asking if the source file is to be reloaded (i.e., re-imported).
A notification can be setup whereby a notification window announces any custom IVol import changes (along with a sound, if defined).
Steps to Import Custom IVol Data
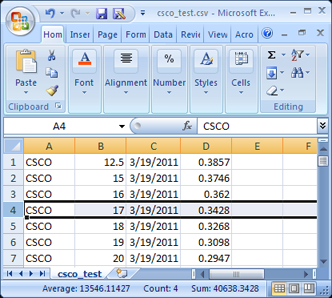
1. The source file must be a comma-delimited file with a .csv extension. The file should contain:
The name of the security
The strike price
The expiration date (Format = MM/DD/YYYY)
The IVol percentage (displayed in decimal format)
In
the example below, the security is CSCO with an expiration of 3/19/2011.
The Strike price is $17.00, and the IVol value is 0.3428.
Note: The IVol value in the
source file will be multiplied by 100 when
it's placed into a WTP grid.
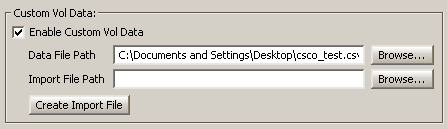
2. In the Data
File Path field in Global Configuration click Browse
and load the .csv file:
If
an Import File exists,
enter it in the Import
File Path field.
If not, leave the field blank.
3. Select Create
Import File. An Import
From File window will display:

Because an import file did not exist, the column heads are listed as <Unassigned>.
Assign a column head to each column by clicking on <Unassigned> and select a name that reflects the data stored in each column.
When finished it should
look like this:
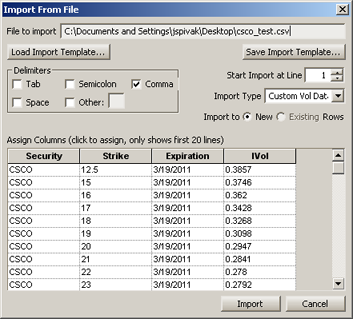
Note that only the first 20 rows of the source file will be displayed.
Optional: Select Save Import Template to save this template for reuse without having to redefine column heads.
4. Click Import.
If the WTP grid does not display the column Custom IVol it must be added.
In the grid,
the Custom IVol values will populate the Custom IVol column:
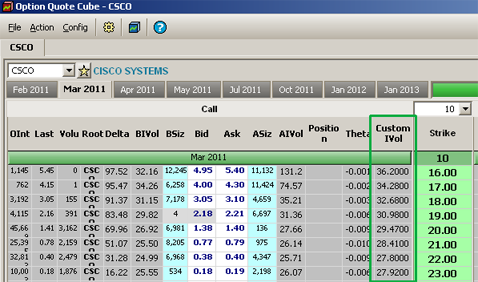
Note that the values in the source .csv file are multiplied by 100 when placed into a grid. For example, in the source file the strike price of $17.00 has a Custom IVol value of .3428. Multiplied by 100, the value displayed in the grid is 34.2800.
Making Changes to the .csv Source File
If a change is made and saved in the .csv source file, a confirmation window will display:
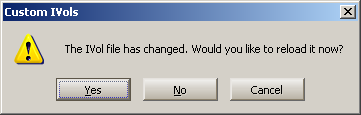
Click Yes to load the changes into the grid. Click No to not accept the changes into the grid.
A Notification can be defined for Custom IVols:
When
a change is encountered a notification will be issued:

Enable/Disable Custom Vol Data
Check the Enable Custom Vol Data to enable both. When checked, "Enable Custom Vol Data" monitors the custom data file path and will send a notification if any changes have been made (see Making Changes to the .csv Source File above). If the check box is disabled, no notifications will be delivered.
If no data file path or import file path exists, be sure to un-check the "Enable Custom Vol Data" box. If Enable Custom Vol Data is checked but no data file path or no import file path exists, an error message will appear when saving Global Configuration.

The workspace that will load upon the initial connection to WTP is set here.
The initial connection is defined as the first connection to WTP following a complete exit. To log on after a log off (while WTP remains running) is not the same thing as an initial connection.
When launching WTP and connecting, WTP will load a workspace based on one of three settings:
Show
Blank Workspace—No
workspace will load.
Restore
Last State—Load
the workspace as it was when WTP was last closed.
Open Specific Workspace—Select the Browse button and choose an existing workspace (with a .wtp extension). This workspace will load the next time WTP is launched and connected.
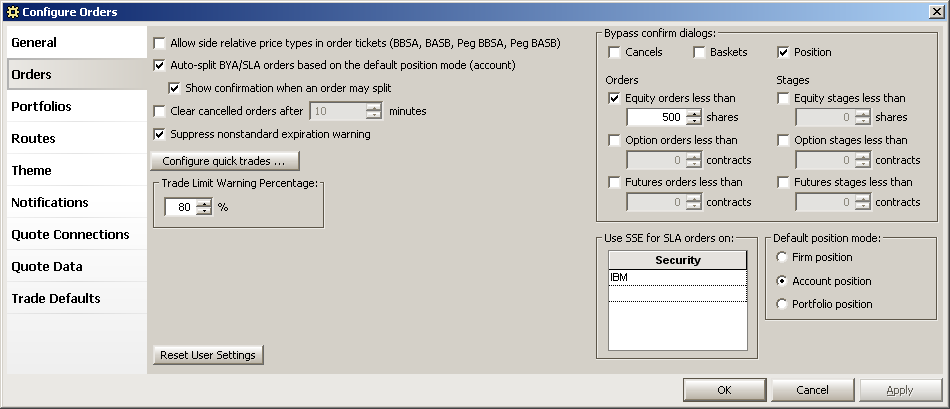
Allow Side Relative Prices
Types in Order Tickets (BBSA, BASB, Peg BBSA, Peg BASB)—If
this box is checked, a warning message will appear:
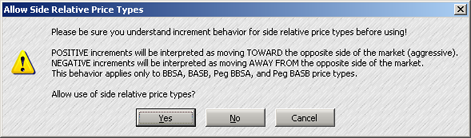
Click Yes if side relative price types are to be included in the Order Ticket. Click No or Cancel to exit the warning screen without allowing side relative price types.
Side Type Definitions:
BASB—Buy at the Ask, Sell at
the Bid, modified by a specified increment
BBSA—Buy
at the Bid, Sell at the Ask, modified by a specified increment
Peg BBSA—Peg Buy at the Bid. Peg Orders allows a user to specify a value they want their order pegged, and an increment that defines an offset from the value. For example, if a price type is Peg Ask with a +.01 increment, the exchange pegs the price of any orders it receives to be one cent less than the best ask.
Peg BASB—Peg buy at the Ask, Sell at the Bid
NOTE: Peg orders are not supported by all exchanges. Check with your WORMS administrator for the routes that support peg orders.
Auto-Split Outright BYA/SLA Orders
If SLA (Auto Sell) is used to sell a security in an amount larger than the currently held position, a flat position will be crossed.
Checking "Auto-Split Outright BYA/SLA Orders" assures that two things will occur: 1. If the sell order is for an amount equal or larger than the currently held position, the security will sell long in an amount that will equal a flat position, and 2. A sell-short order will be issued for any remaining shares.
Conversely, a BYA order that's larger than the currently held negative-position results in a BYC (Buy to Close) order up to the flat position and a BUY order for any amount thereafter.
Example 1:
Current
position on stock XXX is 500 shares.
An SLA order
is sent to sell 800 shares of XXX.
A sell-long order is automatically generated for 500 shares, resulting in a flat position AND a sell-short order is automatically generated for the remaining quantity of 300 shares.
Example 2:
Current
negative position
on stock YYY is -200 shares.
A BYA (Auto
Buy) is issued for 50 shares of YYY stock.
A BYC (Buy
to Close) order is automatically generated resulting in a current
position of -150 shares.
Another
BYA order is issued to purchase 400 shares of YYY stock.
Another BYC order is generated for 150 shares (resulting in a flat position), AND a BUY order is generated for 250 shares.
Show confirmation when an order may split
If this option is checked, a confirmation message will display immediately after executing an SLA or BYA order that will result in a split order.
Clear cancelled orders after _ _ _ minutes
Check this box and enter a number that reflects the period of time (in minutes) in which WTP will purge canceled orders. WTP performance will be significantly improved with this feature.
If enabled, canceled orders will be removed from the Order Grid once the defined time has been achieved.
Note: The default time setting is 10 minutes.
Suppress Nonstandard Expiration Warning
When executing an options trade with a non-standard expiration date, a warning message will display.
If Suppress Nonstandard Expiration Warning is checked, no warning message will display.
Configure Quick Trades
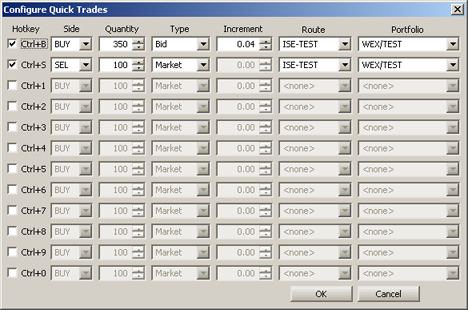
Twelve different hot key combinations can be defined, allowing for quick trade.
To configure Quick Trades:
Press Configure
Quick Trades from the Global Configuration Window.
Check the
box next to the desired hot key combination
Select the
variables that will be in force when typing the hot key combination
(Side, Quantity, Type, Increment, Route, and Portfolio).
Press OK to save the quick trade configuration(s) or Cancel to exit without saving.
Trade Limit Warning Percentage
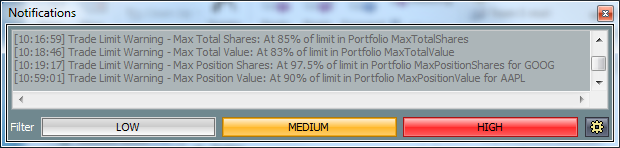
Sample of some Trade Limit warnings
The percentage value set in the Trade Limit Warning Percentage field indicates the point at which a warning message will appear. This value can refer to a number of maximum limits including Max Total Share, Max Total Value, Max Position Shares, Max Position Value. The message informs you that you are approaching a defined limit.
Example of when a warning will occur: You have the permission to trade a maximum of 5000 shares per day. If you set the Trade Limit Warning Percentage to 80%, a warning message will appear once you've traded 4000 shares (80% of 5000 = 4000).
Bypass Confirm Dialogs
The Bypass Confirm Dialogs feature suppresses the confirmation dialog box if any of the following are checked:
Cancels—When an order is canceled
Baskets—All basket orders
Position—All position changes
Select which orders are to have the confirmation message disabled.
A warning message will be issued when selecting any of the following:
For
Equity orders and Equity stages enter the number
of shares. A dialog box will not display for equity orders less than this amount.
For Option orders, Option stages, Futures orders and Futures stages enter the number of contracts. A dialog box will not display for contracts less than this amount.
Default position mode
This option allows users to select a default entity position.
Primarily, this is used when auto-splitting BYA/SLA orders. When an auto-split is encountered, the Default position mode will reference the selected position.
Note: If a user does not have the permission to view a position value, a BYA or SLA order will not split.
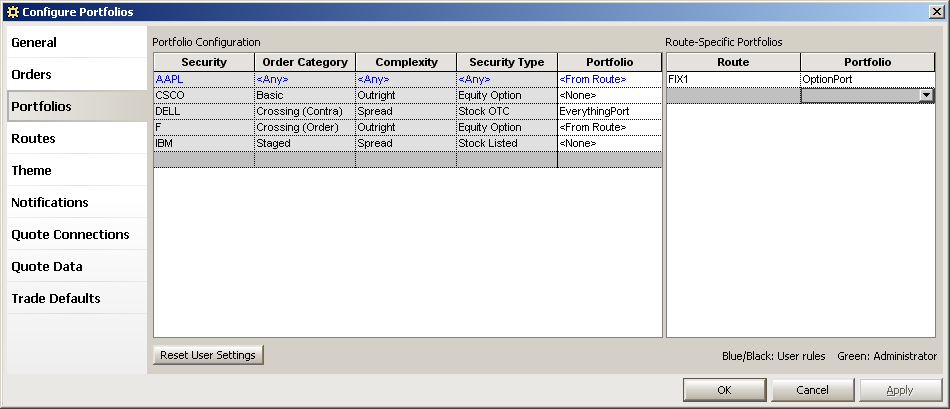
Portfolio Configuration
Users can define default Portfolios in the Portfolios Grid. These Portfolios will be used automatically when defined criteria are met. The criteria are:
Security Name—The name of the Security (AAPL, CSCO, etc.)
Order Category
Crossing (Order)—The
Order Portfolio on a Crossing Ticket
Crossing (Contra)—The
Contra Portfolio on a Crossing Ticket
Staged—The
Portfolio on a Staged Ticket
Basic—The Portfolio on any other Ticket, Basket Trader, or Managed Order
Order Complexity
Spread—Spread
Orders w/multiple Symbols
Outright—Orders with a single Symbol
Security Type—The Type of the product being traded (Option, Equity, Future, etc.)
For all Portfolio Configuration columns, select <Any> to match any selection available in that column.
For instance, when a symbol is entered into an Order Ticket, WTP looks at the defined portfolio configurations to find a rule matching the criteria of the ticket (i.e., Does the Security, Order Category, Order Complexity, Security type, and the Portfolio match?). If a match is found, the default portfolio defined by the matching row will apply to the current ticket. If a matching row is not found, the portfolio will default to Spaces.
To reset all Portfolio settings to their default values, select Reset User Settings.
To accept changes, select OK or Apply. Select Cancel to exit this screen without saving selections.
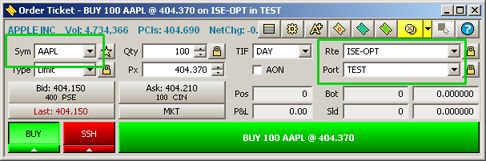
Route-Specific Portfolios

When <From Route> is selected in the Portfolio column of the main Portfolio Configuration grid, and a route and portfolio is defined in Route-Specific Portfolios (in the example above, the Route is ISE and the portfolio Test), the Order Ticket will automatically fill the Portfolio field with the defined portfolio.
In the example below, the symbol AAPL and the route ISE-OPT are selected. The Port field is automatically filled in with the portfolio TEST.
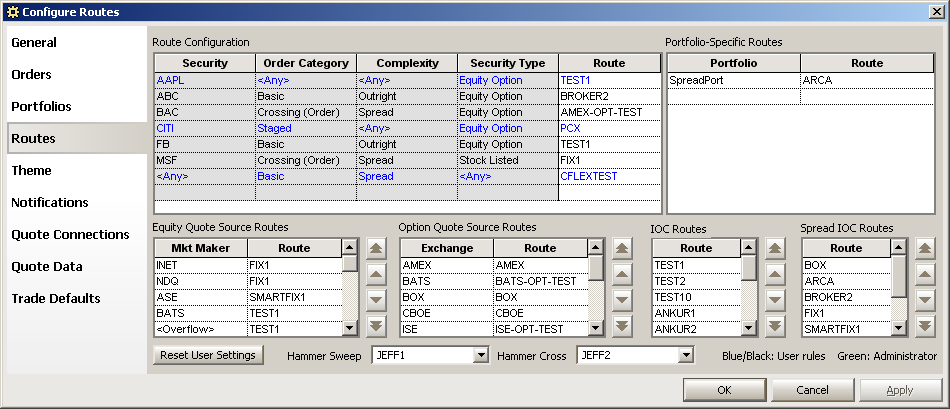
The default behavior in the Order Ticket with regard to routes is set up here.
Route Configuration—Similar in behavior to the Portfolios tab, an Order Ticket will first look here for a rule of a defined security. If it cannot be found, it looks for a listed equity rule. If neither are found, it defaults to blank.
Each column under Route Configuration has a drop-down list. Select the Security, Order Category (<Any>, Basic, Crossing (Order), Staged), Complexity (<Any>, Outright, Spread), Security Type, and Route from the drop-down list.
Equity Quote Source Routes (in priority order)—Market Maker routes are defined here. Their purpose is to identify which routes a Fan Out Grid will fill itself with. By defining a route for the Market Maker, the Fan Out Grid can determine to which route an order can be sent.
IOC Routes are also known as Dark Pool Routes. They are defined in the same manner as other routes (via the drop-down list). When IOC Routes is activated in the Order Ticket, an IOC order will be sent to each of the IOC routes one at a time in an attempt to fill the order.
Spread IOC Routes are similar to IOC routes and are used in the Spread Ticket and Spread Basket Trader.
Portfolio-Specific Routes links a portfolio to a route. If a portfolio/route is defined here and the portfolio is selected when creating an order, its associated route will automatically be selected. Note: This feature is the reverse of the Portfolios section of Global Configuration where a security can be linked to a portfolio via a route when <From Route> is selected.
Hammer Function—"Hammer" is a WEX function that allows traders to sweep the market up to a defined limit price and cross the remaining quantity.
Two routes for the hammer sweep and cross are defined (Hammer Sweep and Hammer Cross respectively).
A window titled Hammer Order Tracker launches when a crossing order with a <hammer> route hasn't immediately filled. If this should occur, the order can be canceled by selecting the Cancel button.
In the example below, the route selected in the Crossing Ticket is <Hammer>. The Hammer Sweep and Hammer Cross routes will be used. Because the order didn't fill immediately, the Hammer Order Tracker launches:
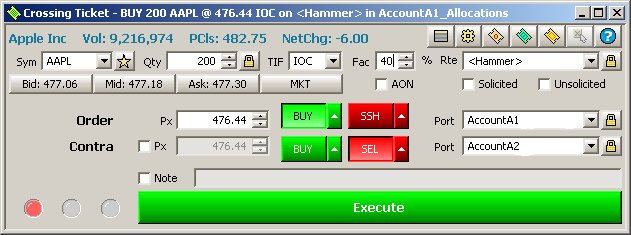
Crossing Ticket in which the <Hammer> route is selected.
![]()
The Hammer Order Tracker launches when a <Hammer> order doesn't fill immediately.
Note: Closing the Hammer Order Tracker will cancel all live <Hammer> orders.
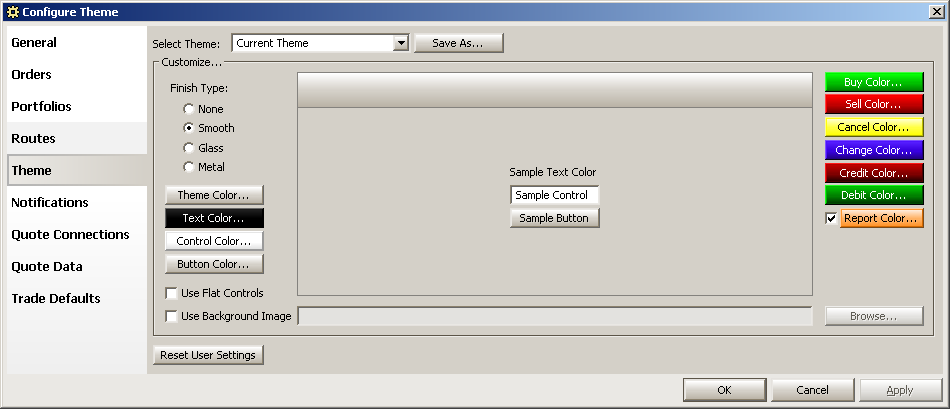
The Theme screen in Global Configuration allows users to gain more control over the look of the WTP screens.
Select Theme
A theme encompasses many visual elements including the Finish Type, text colors, button colors, and control field colors.
Although each color element can be worked on individually, a theme allows for the saving of all color configurations as a .wtp-theme file.
Select one of the pre-defined themes from the drop-down list and it will automatically display in the Global Configuration window. Select OK or Apply to activate the theme throughout WTP.
Save a Theme
A new or existing theme can be saved under any desired name. Once all color configurations have been made, select Save As... The saved file will have a .wtp-theme extension.
Finish Type:
Select from one of the following:
None—No finish type applied to screens and buttons:
Smooth:
Glass:

Metal:
Use Flat Controls When selected, buttons and tabs will have a flat, flushed look:
Use Background Image—A bitmap (.bmp) image can be used as the background for all WTP apps.
Press the Browse button to select the .bmp file that will be imported.
In the image below, a blue-colored bitmap photograph was defined as the background image:
Button Colors can be customized. To change a button color:
Press on the button to be changed.
The color window will appear:
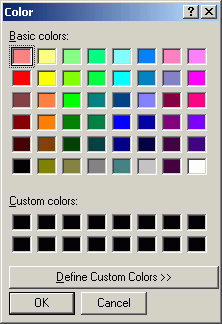
To define colors other than the basic colors, click Define
Custom Colors:

Select a
color either by entering red/green/blue or Hue/Sat(uration)/Lum(inosity)
values, or by moving the mouse and choosing a desired color.
Click OK to save the new color selection or Cancel to exit without saving a custom color.
Theme Color
Select Theme Color to change the background color of all WTP windows and configuration screens. When selected, the color window will display. As with the button colors (above) a selection can be made from pre-defined colors or a custom defined color:

Text Color
Select the color of all text displayed in WTP windows and configuration screens. In the image below, the text color was changed to red:
Control Color
Select the color of content-input fields, check boxes, and radio buttons with this control.
Button Color
Select the color for all buttons in WTP with this control:
The Center Display
The center portion of the Theme window reflects the text, control, and button settings:
Report Color
The Report Color button is used to define the background color of the Report Trade Ticket.
When Report Color is unchecked, the Report Trade Ticket will display in the system default color.
Reset User Settings
Select Reset User Settings to revert to the default WTP color scheme. A confirmation window will launch when making this selection. Press Yes to reset the color values.
Save Changes
Click OK to accept changes and exit or Apply to accept changes and keep the Global Configuration window open.
Click Cancel to exit the window without saving changes.
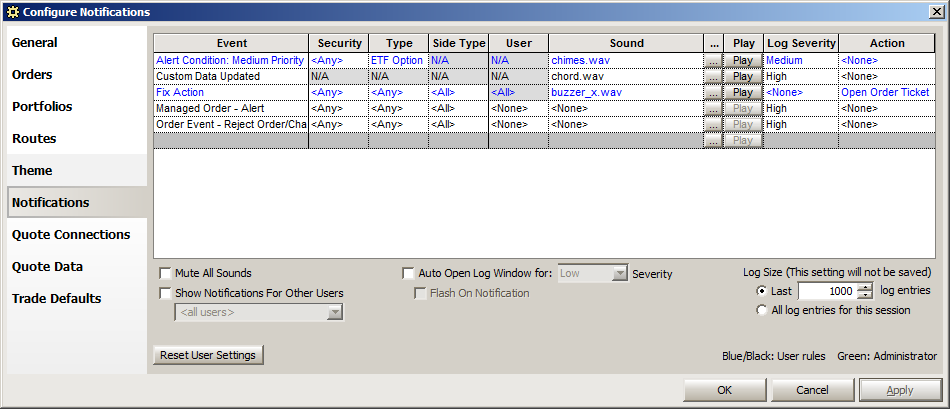
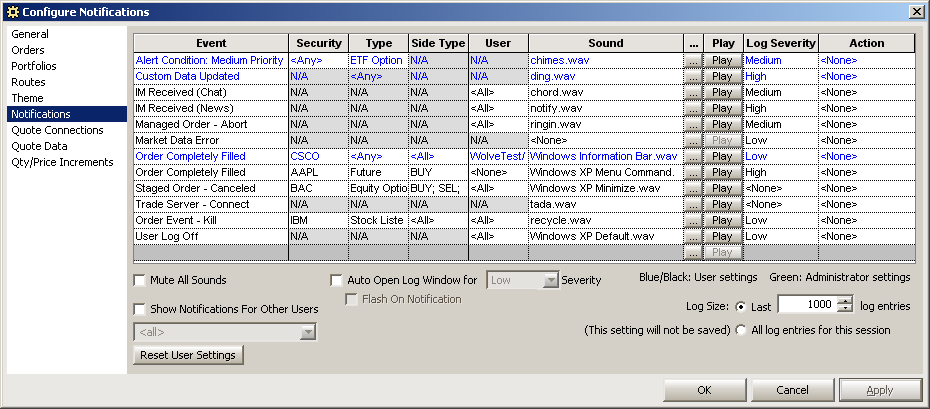
Notifications can be sound files (in .wav format) or notification alerts that play/display when a defined event occurs. Additionally, a log severity can be set that appends event information to a log file.
Events and Sounds
To link an event with a sound:
Select an
event from the drop-down list in the Event column.
If applicable,
select a security name from the Security column. Note:
If notification is to be given for a single event with multiple
securities, each security must be defined individually.
If applicable,
select a security type (example: future, index option, spread,
etc.) from the Type column.
Select a
corresponding sound from the drop-down list (below the Event
column) OR select a .wav file from your system by pressing
the ". . ." button.
Press the
play button to hear the sound that will play when the event occurs.
Note: If no sounds are desired, check the Mute All Sounds box.
Log Severity
A defined event can be flagged as a log severity of Low, Medium, or High. If an event is flagged, the event will be written to a log file.
To link an event with a log severity:
Click on
an event from those listed in the window.
In the Log
Severity column select either Low, Medium, or High
from the drop-down list.
Note: A sound need not be defined in order to record a log severity event.
The Auto Open Log Window
An Auto Log Window will open if a defined log severity condition has been met. This function can also be disabled.
To open or disable a log window:
Select either
Low, Medium or High corresponding to the log severity
event selected (above).
To disable a log window from opening, select Disable Auto Open.
Flash On Notification
When the WTP toolbar is minimized to the taskbar, the WTP taskbar icon will flash if Flash On Notification is checked and the Notifications Window launches.
The flashing of the taskbar icon stops when the Notifications Window is selected.
If it is preferable to not have the taskbar icon flash when a notification is received, do not check Flash On Notification.
Note: Auto Open Log Window must be checked in order to access the Flash On Notification option.
Log Size
The number of entries in a log can be defined.
Enter the
amount of the last log entries that will be saved (or press
the up/down arrows in increments of 100 to define the number).
To save all log entries, select All log entries for this session.
Show Notifications For Other Users
Check the box Show Notifications For Other Users to see all the notifications from other users to whom viewing permissions are granted.
When the feature is active and one or more users have been selected, you will receive notifications when any of those users receive a notification.
Selecting <all> will show notifications for all users in the drop-down list. The only requirement to use Show Other User Notifications is that you must have permission for the action that is to be notified (i.e., portfolio permissions are necessary if you wish to be notified about submitted or filled orders).
Reset User Settings
Pressing Reset User Settings will bring up a confirmation window. If Yes is selected, all settings will revert to their default status.
Accept/Cancel Changes
Click OK to accept changes and exit or Apply to accept changes and keep the Global Configuration window open.
Click Cancel to exit the window without saving changes.
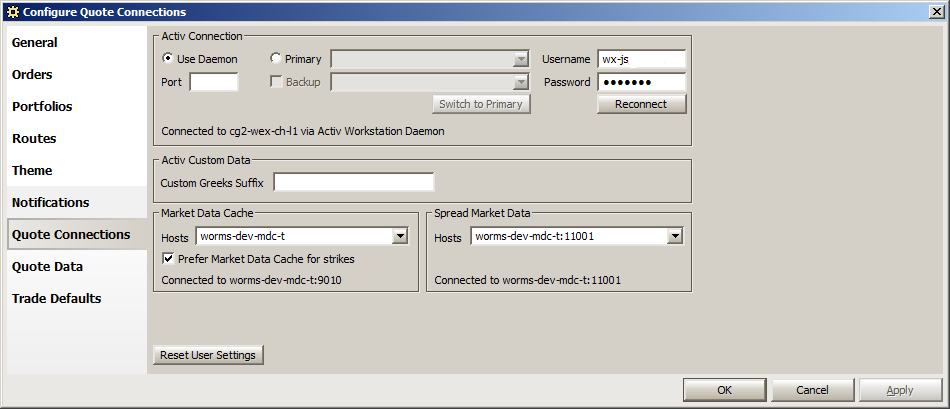
The Quote Connection screen contains settings related to market data server connections and quote services.
When Use Daemon is selected, a Port Number must be entered (e.g., 9003) instead of a full address (e.g., 192.168.187.51:9002). After selecting Apply, a message will be displayed indicating whether or not a connection has made. If the message is "Not connected" it will also display the time (in seconds) in which a reconnection will be attempted.
When Use Daemon is selected, both Primary and Backup selections are unavailable for editing.
2. Via Primary/Backup Connection
If not selecting Use Daemon for the Activ data feed, select a Primary connection address from the drop-down list, or type one in the Primary field. Optionally, a backup connection can be defined by checking the Backup box and selecting the backup address (or entering an address in the Backup field).
The primary/backup fields are formatted as Host Name: Port.
Enter also a predefined Username and Password.
The Activ-Connection toggle button, Switch to Primary/Switch to Backup is used for toggling the Activ connection. When the backup Activ connection is in force, the Switch to Primary button will be displayed. Selecting it will switch the Activ connection to the primary address.
Conversely, the button will display Switch to Backup if the primary connection is being used (and will connect to the Backup connection if selected).
Note 1: The Switch to Primary/Switch to Backup button is available only if Use Daemon is not selected and primary and backup Activ connection addresses are enabled and populated.
Note2 : All fields relating to the Activ connection are normally set up during WTP installation.
If Activ has not been able to make a successful connection, selecting Reconnect will display any username or password issues that need to be fixed.
Reconnect can also be used to manually disconnect from, and reconnect to, Activ.
Before selecting the Reconnect button, be sure to save configuration changes by hitting Apply.
Note: This feature can be used to forcibly disconnect other WTP instances using the same username from Activ. Contact WEX Support to have the feature enabled.
The Market Data Cache is useful for quickly retrieving large amounts of historical volatility, news, and option tick data.
This field contains the name and port (default value: 9010) of the Market Data Cache server.
Prefer Market Data Cache for strikes
Check this box if it is preferable to use the value in the Mkt Data Cache field for all strike quotes.
The Spread Market Data field is a suite of server applications that provide market data for complex strategies. Enter the host name in the text field or select one from the drop-down list.
Reset User Settings
Select Rest User Settings if default values for Quote Connections is desired. A warning message will appear "Are you sure you want to reset these configuration settings?". Select Yes to reset the settings.
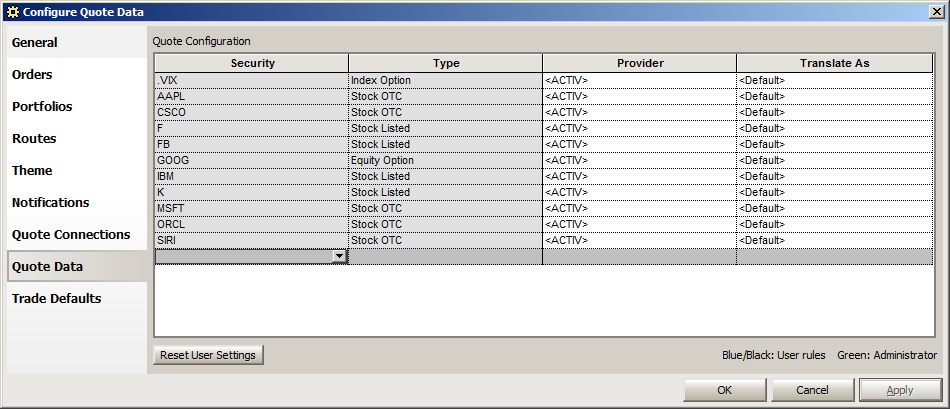
The Quote Data screen is used to define how WTP requests market data.
Quote Configuration
A security name and type (Stock Listed or Equity Option) are defined. Its Quote Service is the Activ service to use for quote data (based on the security and/or type)
In the Security field, a security name is not necessary. To refer to any security, use <any>.
Also, wildcard card characters can be used.
Wildcards in the Quote Configuration Table
In the Security and Translate
As fields, wildcard characters can be entered in place of hard-coded
characters.
The wildcard characters
that can be used are:
* (matches one or more characters)
? (matches a single character)
Example In the Security field is the value <any>. Translate As field, the value entered is *.0 This rule will cause a request for any symbol (i.e., MSFT), to be translated as MSFT.0 in the listed Quote Service. |
{1} (refers to the first wildcard character in a string)
{2} (refers to the second wildcard character in a string)
U forces a matched string to uppercase
L forces a matched string to lowercase
Example
In the Security field is the following, using two wildcard characters: *.PR? (meaning: any security with an extension of .PR and one other character)
In the Translate As field is the following using wildcard characters: {1}_p{2L} (meaning: translate the * of the security to read a security name, place an underscore character, the letter "p" and one letter in lowercase)
A request for ABN.PRF will translate as: ABN_pf
A request for FCX.PRF will translate as: FCX_pc |
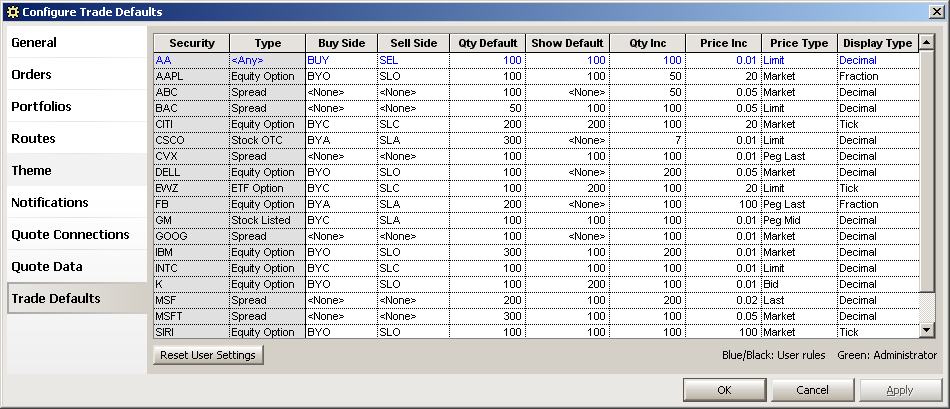
Default values such as quantity default, quantity increments, and price increments are defined here.
Set
default quantities:
Select a
Security and Type by entering the values manually,
or select from the drop-down lists.
Enter the
default quantity.
Enter a
value in the Show Default column. This value defines the
show quantity for new orders. If the value is set to <none>
the show quantity will match the order quantity.
Enter
a value in the Qty Inc field. The value refers to the increment
increase each time the Up or Down arrows are selected (in the
Order Ticket for
example).
Enter a
value in the Price Inc field. This defines two things:
the increment in which the Up/Down arrows move, and the number
of decimal places that will be displayed.
Example: A value of 0.010 means that prices should increment at one cent at a time, and display up to 3 decimal places |
Enter a Price Type manually, or select one using the drop-down list.
The DISPLAY TYPE Column
In the column DISPLAY TYPE select the method for displaying values:
Decimal—Displays values in decimal
form.
Note: The default value
<none> displays the same as Decimal.
Fraction—Displays values in
fraction form and works in conjunction with the Price Inc column.
When Fraction is selected, choose a denominator value from the
Price Inc column: 10, 16, 20, 32, 64, 100, 128, 256.
Tick/Half-Tick/Quarter-Tick—Displays values in Tick form. This display type is setup per the Fraction type above, where a denominator value is selected in the Price Inc column.
© 2015 Wolverine Execution Services, LLC