

Basket Trader allows users to send batches of equity, option, and/or future products together in a single basket order locking in true markets. Each row in the Basket Trader grid is a separate order which can be configured. Multiple baskets can be loaded, allowing a user to toggle between them. Multiple asset classes can be loaded into the same basket, allowing for the launch of options, futures, and equity orders in the same wave. Basket Trader waves can be viewed in the Wave Grid.
The Crossing Basket is a similar applet to Basket Trader but it used for crossing orders. The Spread Basket is called when Spread Viewer sends it spread orders.

Click Trade on the WTP toolbar and select Basket Trader.
Alternate Method:
From the WTP menu select Basket Trader.
A basket is a collection of symbols (i.e., securities), each symbol having its own trading parameters. Any number of baskets can be created. Additionally, folders can be created that hold baskets. This allows for complete customization of basket tree.
Create a basket:
Right-click anywhere in
the Basket Trader grid. Select File Commands --> New Basket
Alternate Methods:
Click
on the New Basket button  .
.
From
the WTP toolbar click Basket Trader. Select File -->
New Basket
If the display is in Multi-Basket Mode, right-click where other baskets are listed and select New File
The name of each new basket, by default, is New Basket.
Rename a basket:
Right-click
on a basket name that is to be changed.
Select Rename
Type in the new name of the basket and hit enter.
Remove a basket:
Select a
basket by clicking on it.
Press the
delete key
Alternate Method:
Right-click and select Remove
A confirmation window will appear. Select Yes to remove the basket, No or Cancel to prevent the basket from being removed.
Select a
basket by clicking on it.
Select the
Save Basket button  .
.
A Save
Basket window will appear. Select a desired folder for the
basket. The file name will default to the basket's name. Select
Save.
The basket is saved with a .bbk extension.
Note: The option Save Basket As... works in the same
manner as steps #3 and #4.
Alternate Method for Step 2:
Right-click
anywhere in the Basket Trader grid.
Select File Commands --> Save Basket
Right-click
anywhere in the Basket Trader grid.
Alternate Method:
Right-click anywhere in the list of baskets (in multi-basket mode).
Select File
Commands --> Open Basket
Alternate Method:
Click on the Open Basket button 
Right-click in the list of baskets and select Open File...
Choose the
saved basket by maneuvering to the directory where it's stored.
Double-click
on the basket name to open it.
When Basket Trader is in Multi-Basket Mode it means that all created baskets (and folders) will be visible on the left pane of the Basket Trader window.
If Multi-Basket Mode is turned off, only the current basket will be loaded into Basket Trader and the left pane will not be visible.
Select the Basket Tree
button  to toggle on/off the display of all baskets.
Alternate Method:
From the Config menu select Show Basket Tree.
Folders can be created in Basket Trader. Similar to folders created on your computer, these folders can store baskets, allowing for the creation of a directory tree. Folders are optional in Basket Trader.
Create a folder
With Basket
Trader in multi-basket mode, right-click anywhere in the
list of baskets (not on the grid itself).
Select New
Folder. A folder with the name "New Folder" will
appear.
Rename the
folder as desired. Right-click on the folder and choose rename.
Delete a folder
Click on
a folder name to delete.
Press the
delete key OR right-click and select Remove.
A confirmation
window will appear. Press Yes to delete the folder. Press
No or Cancel if the folder is not to be deleted.
Note: Any baskets residing in a folder will be deleted when
the folder is deleted.
Move Baskets into a Folder
Existing baskets can be placed into a folder.
Click on
a basket to highlight it.
While the
mouse is pressed move the basket to the appropriate folder and
release the mouse button.
Once a basket has been created, it needs to be filled. The two most important (and required) items to place in a basket are:
Securities—Products
that are to be bought and sold, identified by their symbol
Weight—The number of shares or contracts that are to be purchased or sold
Add Security Names to the Basket Trader Grid
In the Symbol column, security names are listed. To add a symbol name:
Click the
mouse button in the Symbol column on a row where a name
is to be added.
From the drop-down list, select a security name.
Once a symbol has been
added to the Basket Trader grid, other columns (such as Weight)
will fill in with default values.
Configure Trading Parameters
Once a symbol has been added to the Basket Trader grid, trading parameters should be configured. The most important of these, is weight, portfolio, route, and min trd qty. With these values in place, issuing a trade with the basket's securities can commence.
To configure other columns in the Basket Trader Grid:
Click on
a row to highlight it.
Move the
mouse to the column whose value is to be defined.
Enter the
desired value (note that some columns have drop-down lists, others
have up/down arrows).
Before issuing buys or sells in Basket Trader, it is helpful to set up other configurations such as maximum basket quantity, basket details, and other values.
To configure Basket Trader:
Right-click
anywhere in the Basket Trader Grid and select Configuration
Alternate Method:
From the WTP toolbar, click on the Basket Trader column
and select Config --> Configuration
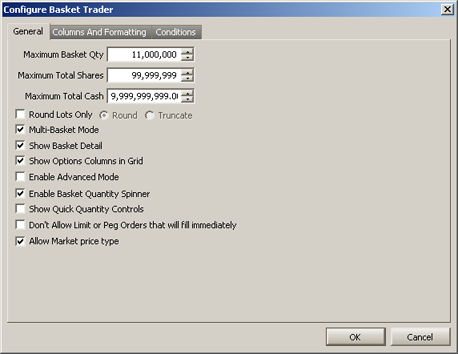
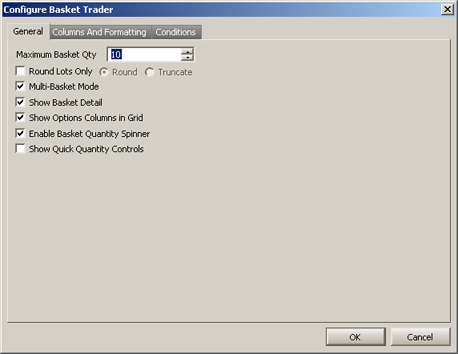
The
configuration window will display. Edit the fields, and check
or uncheck features as necessary:
Maximum
Basket Qty—This value refers to the maximum quantity that
can be sent in any single order.
Maximum
Total Shares—The maximum trade quantity that can be sent at
one time.
Maximum
Total Cash—Basket Trader will compare your trade parameters
with the value entered in this field. If the total trade amount
exceeds this value, Basket Trader will not allow the trade to
go through.
Round
Lots Only—Check this box and select Round if trading
in round lots (i.e., 100, 200, 300, etc.) is desired.
Truncate—Check the box and select Truncate if Basket
Trader is to reduce the size of the order and keep the size as
a round lot.
Multi-Basket
Mode—Check this box to view all created baskets. They will
be visible on the left side of Basket Trader. If unchecked, only
the current basket will be displayed. Multi-basket mode is convenient
for traders as different baskets can be selected with just a mouse
click.
Show Basket
Detail—If checked, the Basket Trader grid is displayed. If
unchecked, only the Override and Basket Trade tables will be visible.
Alternate Methods:
Select the Basket Detail button  .
.
Right-click on Basket Trader and select Show Basket Details.
Show
Options Columns in Grid—The following columns are added to
the Basket Trader grid if this option is selected:
Option (Call/Put), Underlier, Root, Strike, Exp. Date
Enable
Advanced Mode—If this box is checked, the Override Advanced
Order Parameters fields (such as start/stop times and book
only/sweep selections).
Enable
Basket Quantity Spinner—The up/down arrows (spinners) will
be enabled if this box is checked.
Show
Quick Quantity Controls—If checked, quantity buttons (1, 5,
10, 25, 50, and Clear Qty) are visible on Basket Trader (below
the Basket Trade area). These buttons allow for one-touch quantities
as opposed to manually entering the desired values.
Don't
Allow Limit or Peg Orders that will fill immediately—If this
box is checked any limit order or peg order that can be filled
immediately won't be. If unchecked, limit and peg orders that
can fill immediately, will be filled.
Allow Market price type—Check this box if you want the Market sell type as an available Override Order Parameter option. If unchecked, the Market sell type will be unavailable for selection.
Before trading can begin in Basket Trader, it is assumed that:
At least one symbol has been defined, along with its weight, portfolio, route, and minimum trade quantity
Issue a basic trade in Basket Trader:
Check the
box next to each symbol in the basket that is to be bought or
sold.
In the Basket
Trade portion of the Basket Trader window, select Trade
Mode and define a quantity amount.
Press BUY
or SELL to initiate the trade.
A confirmation
window will appear. Press OK to send the basket trade or
Cancel to exit without sending the basket.
Here are a couple examples of basket trades, including an error condition that traders might encounter, with an easy fix:
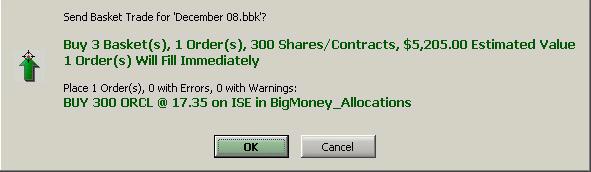
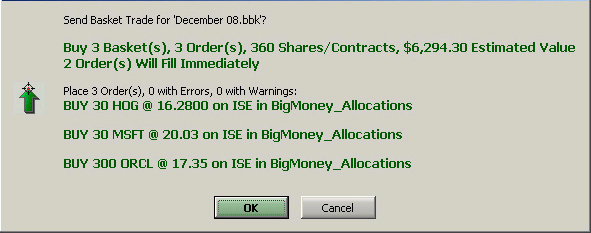
EXAMPLE ONE—A SINGLE
SYMBOL BASKET TRADE:

In this example, one symbol (ORCL) has been checked (i.e., selected). The symbol has these parameters:
The
number of share to trades is 100 (the weight)
The
minimum trade quantity is 300
In
the Basket Trade section of the window, the quantity has
been defined as 3.
To achieve a successful basket trade, this basic formula must be
followed for any symbol:
|
Because the quantity (3
baskets) multiplied by the weight (100) = 300 (the minimum trade quantity)
a basket trade can be filled. A confirmation window appears after
pressing Buy:
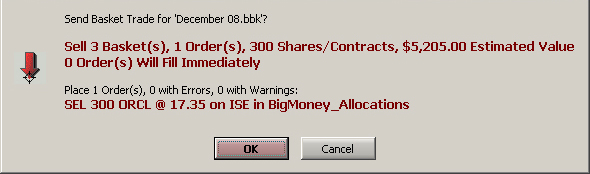
A sell order brings up this confirmation window:
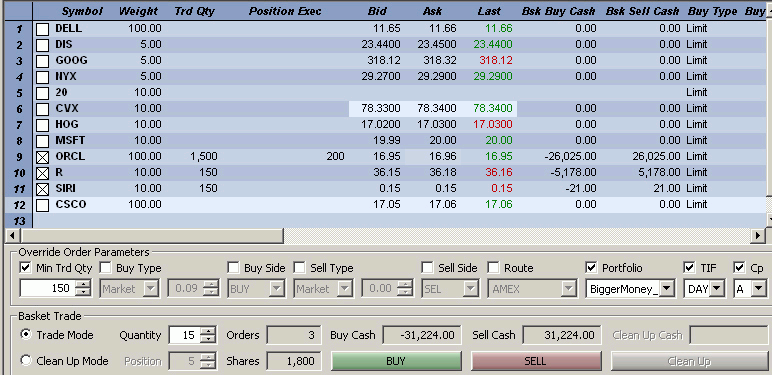
EXAMPLE TWO—THREE SUCCESSFUL AND ONE REJECTED BASKET TRADE:
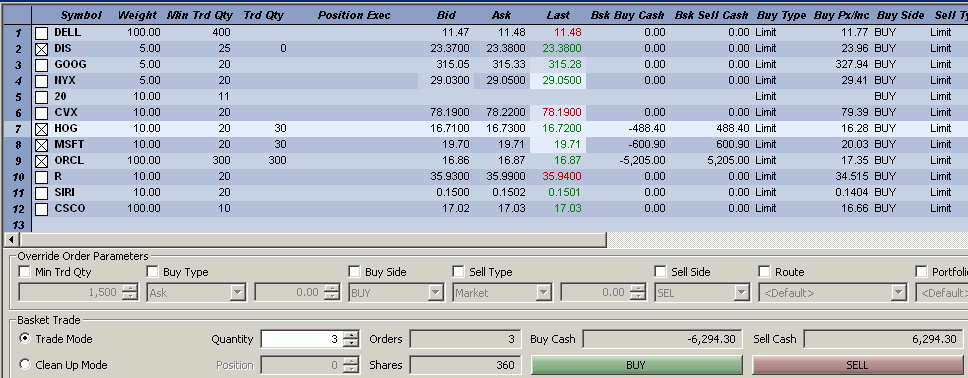
In this example, 4 symbols have been selected, but only 3 will be traded. The symbol DIS will not trade because the quantity (3) x weight (5) is less than the min trd qty of 25. The column Trd Qty will reflect the number of shares to be traded.
The confirmation window
will mention only the basket orders that can trade:
If a basket order cannot be filled this message will appear:

In the Basket Trade section of the Basket Trader window are two options: Trade Mode or Clean Up Mode.
Clean up mode is a method to revert to a specified position (as specified in the Position box).
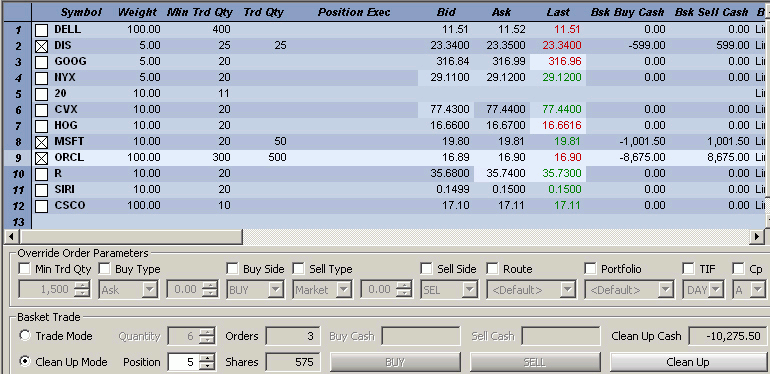
In the above example, 3 symbols have been selected, the Basket Trade portion of the window is in Clean Up Mode, and with a position of 5.
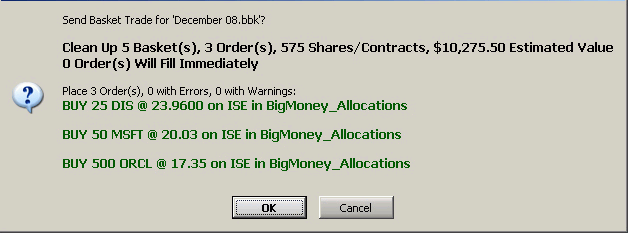
The confirmation window describes the transaction:
Certain trade parameters can be overwritten. Items such as Minimum Trade Quantity and Portfolio can have values assigned that overwrite an individual symbol's configuration. Once symbols are selected and values are placed in the Override Order Parameters section of Basket Trader, the override parameters are in force. When an override is enabled, its corresponding column is removed from the grid.
Override Definitions and Examples
Column Name |
Definition |
Content Example |
Min Trd Qty |
The minimum number of shares per order |
Any integer |
Buy Type |
The price type of the security when buying |
Market, Limit, Peg Bid, Peg Ask, Peg Mid, Peg Last, Bid, Ask, Mid, Last |
Buy Side |
The side type for buy orders |
BUY, BYO, BYC (can be blank) |
Buy Px/Inc |
Specified if Buy Px Type requires either a price (like "Limit") or increment (like "Mid") |
Any integer (can be zero) |
Sell Type |
The price type of the security when selling |
Market, Limit, Peg Bid, Peg Ask, Peg Mid, Peg Last, Bid, Ask, Mid, Last |
Sell Side |
The side type for sell orders |
SEL, SSH, SSE, SLO, and SLC |
Sell Px/Inc |
Specified if Sell Px Type required a price (like "Limit" or increment (like "Mid")) |
Any integer (can be zero) |
Route |
The routing destination for the security |
The route (can be blank) |
Portfolio |
The portfolio of the security |
The portfolio name (can be blank) |
TIF |
Time In Force instruction |
DAY, FOK, IOC, OPG |
CP |
Capacity instruction |
Should be set to "A" unless doing Index Arb, or Program Trading |
The Basket Trader grid can be viewed in read-only mode. Symbols cannot be selected while in read-only mode.
To set Basket Trader in read-only mode:
Right-click
anywhere in the Basket Trader grid.
Select File
Commands --> Read Only Mode
Alternate Method:
From the File menu, select Read Only Mode

Additional configurations can be selected for the basket while in Advanced Mode:
Show—The
value entered in this field represents the total desired quantity
that should be available on an Order book.
Disc
(Discretionary)—The discretionary
value in which an order can be filled.
%
Vol (Volume)—Volume percentage,
used for VWAP orders. Values from 0 to 100.
Agg
(Aggression)—Used for algo
routes. Values from 0 to 10, reflecting how much a user wishes
to "push" the market in an aggressive fashion.
Start/Stop
Times—Start and/or Stop times
for Basket Trader to send basket orders can be defined. If both
are unchecked, Basket Trader will endeavor to send basket orders
immediately and stop at the end of the trading day.
Give-up—A transaction between three brokers
where one broker hands off a trade to a second broker, who then
buy the stock from a third. The third broker exercises the trade,
while the first broker gives
up the name of the
second broker, even though the trade is executed between the first
and third broker.
Example: Broker A receives a buy order, but is too busy to handle
it. Broker B is asked to help fill the order and buys the stock
from Broker C. The transaction is recorded between Brokers B and
C. Broker A, in effect, gives
up the name of Broker
B. The trade, however, is executed between Broker A and Broker
C.
Select a Give-up value from the drop-down list.
CMTA
(Clearing
Member Trade
Agreement)—An
agreement where an investor trades with a number of different
brokers, later consolidating the trades through a single broker
for clearing.
Account
Type—If designating an account
type other than the <default> is required for the basket
order, select one from the following:
Broker Dealer
Customer
Firm
Market Maker
Professional Customer
Note—Enter a free-form note in this field.
The location of the Note field
depends on which Basket Trader is being worked:
For the Standard Basket Trader and Spread
Basket Trader the Note field is in the Override Advanced
Order Parameters section.
For the Crossing
Basket Trader and
Staged Basket Trader
the Note field in the
Override Order Parameters section.
IOC
Routes—Immediate Or
Cancel routes can be selected
for basket orders. IOC routes are configured under the Routes
tab in Global
Configuration.
The IOC Detail window will display if checked (see image above).
Once a basket buy/sell order is executed, the IOC Tracker window
will display:
![]()
Each order can be selectively stopped or continued. Exiting the
IOC Tracker while there are active orders will cause all active
orders to be stopped.—Immediate Or Cancel routes can be
selected for basket orders. IOC routes are configured under the
Routes tab in Global
Configuration.
The IOC Detail window will display if checked (see image above).
Once a basket buy/sell order is executed, the IOC Tracker window
will display:
![]()
Each order can be selectively stopped or continued. Exiting the
IOC Tracker while there are active orders will cause all active
orders to be stopped.
AON—All Or
None. If checked, all items
in the basket will be sent with the understanding that all orders
need to be filled. If, for whatever reason, all orders cannot
be filled, all will be canceled.
If unchecked, each symbol individually
can be selected for all-or-none
processing. The AON column must be visible in the basket detail
portion of the Basket Trader window to individually select a symbol.
Sweep—A sweep order instructs an exchange
to only route an order to fast exchanges.
Book Only—A book only order instructs an exchange to not route an order. Either the order will fill an order currently on the exchange's book, or it will remain unfilled.
Set Basket Trader in Advanced Mode:
Right-click
anywhere in the Basket Trader grid.
Select Enable
Advanced Mode.
Alternate Method:
From the WTP toolbar, click on the Basket Trader Column, and select
Config --> Enable Advanced Mode.
The status bar in the Basket Trader window displays the applet's status (i.e., "Ready") and the time of day. The status bar can be toggled on and off. The default status is ON.
Turn the Status Bar on or off:
Click on
the Basket Trader column on the WTP toolbar.
Select Config
--> Status Bar
Repeat this action to turn the feature off (if it's on), or on
(if it's off).
The data contained in Basket Trader can be exported:
As
a file
To
the clipboard
To
a Microsoft Excel spreadsheet
To learn the specifics of exporting grid data, click here.
Grid data from an ASCII text file or Microsoft Excel spreadsheet can be imported into Basket Trader.
Both comma-separated files (.csv) and text files (.txt) can be imported.

In the image above, an ASCII text file has been created with fields delimited by a comma. The stock symbols, weight, and buy and sell price are listed.
From the
File menu select Import Basket.
Alternate Method:
Right-click in the Basket Trader grid and select File Commands-->Import
Basket.
By default
the Files of type will be set to Comma Separated Files
(*.csv). You can also select Text Files (.txt).
Open the
file containing the grid data that is to be imported. The Import
From File window will launch with the imported data displayed:

Assign column
names to each column in the Import window by clicking on the column
head and select the appropriate column descriptor:
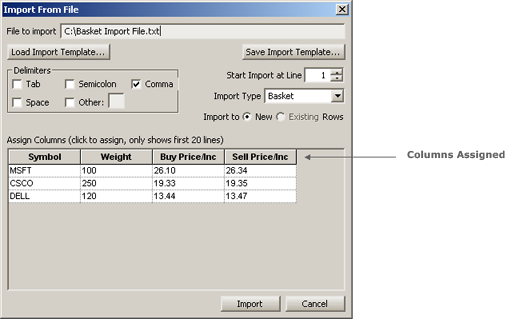
Click Import
to bring the data into Basket Trader. The name of the basket will
reflect the name of the imported data file.
Note: Due to market fluctuation, values such as bid/ask will
undoubtedly change once they are imported.
Additional "Import Basket" Details
Start Import At Line—The number in this field refers to the line number in imported file. When the file is imported, the first line displayed in Basket Trader will be the line selected here. If the imported data file contains column headings of its own, then the "Start Import at Line" value should be adjusted to where the headings will not be imported.
In the example above, Line 1 is selected. When the file is imported, Line 1 will be the first line displayed.
Import Type—Basket is the only available selection.
Import to—Two choices, either New or Existing Rows
New—A
basket will be created that contains all the selected rows of the
import file.
Existing Rows—Not available for Basket Trader.
Delimiters—This checked box refers to the field delimiters in the import file. A different delimiter can be selected, but better results will occur with the delimiter used in the import file (i.e., a tab-delimited file will produce better results when tab is selected).
Templates—Once the columns have been assigned names, they can be saved for later use. Press Save Import Template to save and name your template.
When importing a file with the same import type, press Load Import Template and select the appropriate template for your import type.
Orders that have been executed, but not filled, can be canceled.
To cancel ALL orders:
Right-click
anywhere in the Basket Trader grid.
Select Cancel
All Orders
Alternate Method:
From the WTP toolbar, go to the Basket Trader column and select
Action --> Cancel All Orders
To cancel Matching orders:
Right-click
anywhere in the Basket Trader grid.
Select Cancel
Matching Orders --> and one of the following:
Cancel All For Symbol...
To Route...
In Account...
In Portfolio
OR
From the WTP toolbar, go to the Basket Trader column and select
Action --> Cancel Matching Orders for the same options.
Crossing Basket works in a similar fashion as Basket Trader but is used when creating crossing orders. Also, the Crossing Basket does not offer an advanced mode due to the fact that advanced mode parameters are displayed by default.
Launch Crossing Basket
Click Trade on the WTP toolbar and select Crossing Basket Trader.
Alternate Method:
From the WTP menu select Crossing Basket.
Issue a Basket Trade with a Crossing Route:
When a crossing order is executed, the Crossing Tracker applet opens allowing for the management of all crossing orders.
The
route <Crossing> must be selected. The Crossing Route
is based on the Option Quote Source Routes defined in Global Configuration.
Crossing Route(s) must be enabled (see the Crossing Route Detail section of Basket Trader above).
Crossing Basket Configuration
The Crossing Basket configuration screen is similar to the Basket Trader with a few exclusions:
See General Configuration for detailed descriptions each field.
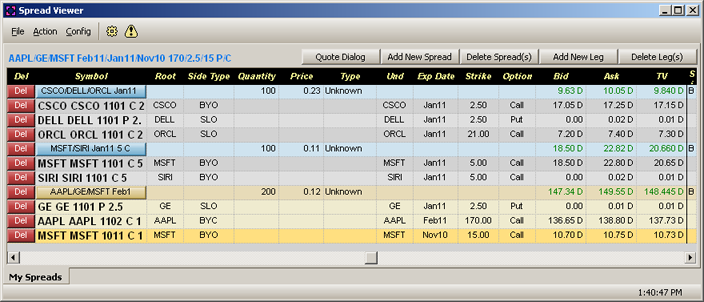
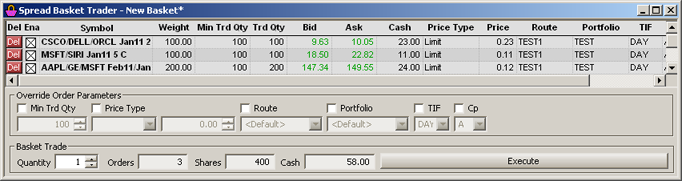
The Spread Basket Trader is a standalone applet used to send multiple spread orders in a single basket.
Launch Spread Basket Trader
From the WTP menu select Spread Basket Trader.
Alternate Method:
From the WTP toolbar select Trade-->Spread Basket Trader.
In the images above, three spread orders are defined in Spread Viewer and sent to the Spread Basket Trader.
Operating in the same fashion as the standard Basket Trader, orders sent via the Stage Basket Trader are different because they represent an intention to trade waves of single orders.
New orders for a particular security can be attached to the same security in the basket, reducing the staged order's amount. Viewable in the Order Grid, Stage Basket Trader orders can be changed or released.
Launch Stage Basket
From the WTP menu select Stage Basket Trader.
Alternate Method:
From the WTP toolbar select Trade-->Stage Basket Trader.
Learn more about staged orders here.
The Conditions window is similar in function to Row Color Conditions window. Click here to learn how to configure the Conditions window.
![]()
© 2015 Wolverine Execution Services, LLC